|
There are a number of people on the Internet who model the Rio Grande Southern. Those
who would be happy to hear from you can be found below. Please do drop us a line.
R.G.S Modellers
| Name | E-Mail | Web | Comment |
|---|
| Charlie Brown | Yes | No | Atlanta U.S.A |
| Craig Stewart | Yes | No | U.S.A |
| Craig Symington | Yes | No | Ontario, Canada |
| Doug Hitchcock | Yes | No | Kansas City, USA |
| Ernie Valentine | Yes | No | U.S.A |
| Greg Hiley | Yes | No | Sydney, New South Wales |
| Gregory Posta | Yes | No | Dallas Divide (CO) U.S.A. |
| Joe Fuss | Yes | No | Pensylvania U.S.A |
| John Humphrey | Yes | Yes | Perth, West Australia |
| Josh Levine | Yes | No | Georgetown, (CO) U.S.A |
| Steve Harris | Yes | No | San Diego U.S.A |
| Steven Haworth | Yes | No | Chicago U.S.A |
| Steve Zonay | Yes | No | Liberty (SC) U.S.A |
| Ted Wiese | Yes | No | Kirtland (OH) U.S.A |
If you would like to be included in this list, then just let me know your details.
What's New
I've recently "removed" the HOn3 layout described below. In it's place will
be a new RGS layout. This time though the layout will be in Sn3 rather than HOn3
and it will depict the turn-of-the-century era.
I've pretty much decided that I'm going to model the Dolores area, and maybe
part of the timber line. See below for some pictures and info on progress so far.
My Model Railroad (as it used to be)
Location
I live in Perth, West Australia, so modelling the Rio Grande Southern might seem a
bit strange. Actually it is, but as many people have found out, once that narrow gauge
bug bites you, you're hooked.
I constructed my HOn3 layout in a purpose built room in my backyard. It occupies
approximately 20' x 22' of real estate. The walls of the room have been lined and a
drop ceiling (complete with fluorescent lights) installed to reduce the effects of our
summer sun, and light up the interior.
The layout represented the RGS from Placerville, through Vance Junction and Ophir and
on to Lizard Head. The branch from Vance to Telluride is also included.
(Please read the Brief History of the RGS to view the
route map). The track plan is a linear design which uses hidden staging yards.
View of the track plan. (15K)
Construction
The railroad was built using 2" x 4" studwall style construction, with the typical
L-Girder style of plywood sub-roadbed. No other material such as cork or homosote was
used for a roadbed. The line went from 52" to 61" above the floor.
A backscene was constructed from masonite which went nearly all the way to the
ceiling . This provided a very effective view block whilst still allowing space for
airflow. A good friend, Rod Wyman then painted the backscene for me. He does a much
better job than I could ever do.
Image of the backscene (33K)
The valley behind Vance Jct (45K)
The trackwork was a mixture of Shinohara turnouts and RailCraft code 70 flex track
which when painted and ballasted is difficult to tell from hand-laid track. Turnouts
are controlled by either Switchmaster slow-motion motors, or Caboose Industries N-Scale
sprung ground throws.
The scenery was constructed using both a substructure of styrofoam (beadboard) and/or
the traditional cardboard web. On top of all this goes a layer of plaster and rock
castings for texture. A clay type kitty litter is used to represent the talus and
gravel, with Woodland Scenics ground foam for the grass.
View of some scenery (37K)
Vance Jct Yards (42K)
Lizard Head under consruction (28K)
Evergreen trees are constructed using the "bottlebrush" method, whilst aspens are
built using Harry Sages' techniques from Model Railroader Magazine. Water is created
by painting the river surface, and covering with layer of gloss meduim.
Nearly all of my structures were scratchbuilt using plans from Mike Blazek, or
from those published in magazines. They are all constructed using Evergreen styrene,
Grandt Line details and Campbell's shingles. The only non-scratchbuilt item so far is
a Durango Press water tank.
Image of Vance Jct Section House (45K)
Image of Vance Jct Coal Drops (44K)
Locomotives and Rolling Stock
All of my locomotives were brass imports, which were re-motored using Swiss made
micro-motors and gearheads. This gave the locomotives a much smoother performance, and
more importantly, a top speed of about 20 scale mph. It took my locomotives about a
full minute to travel 10 feet flat out.
The majority of the rolling stock were kits from MRGS, RailLine, GrantLine and
Precision Scale. Other items were kitbashed, and some, such as caboose 0400 were
scratchbuilt.
Image of a locomotive #460 (35K)
Image of boxcar #3633 (26K)
Control and Operation
The layout was controlled using the Digitrax
brand of command control system. This system is DCC compliant and provides excellent
operation and features for a very affordable price.
Shows
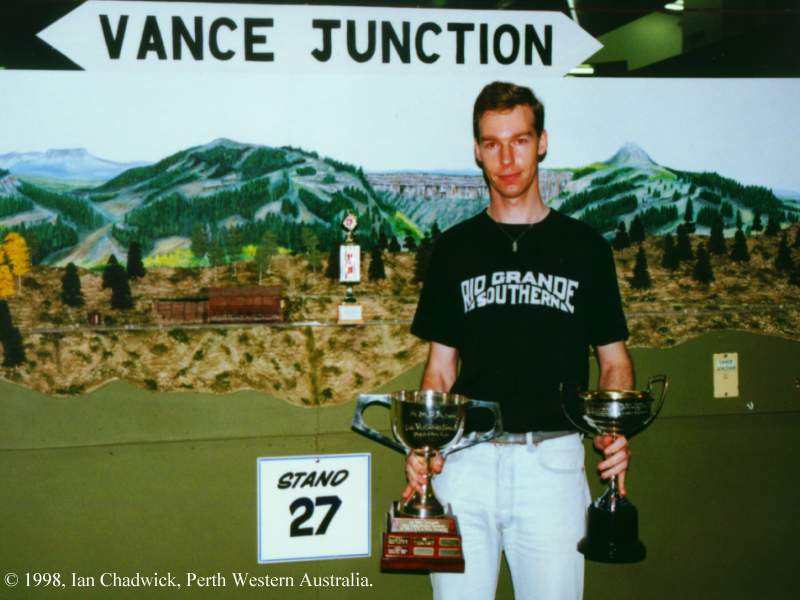
Part of the layout was shown at the local model railroad exhibition (Australian
for RR Shows). I displayed the Vance Junction yard area, with a "train length" turntable
at each end for staging. The layout ran for eight hours a day, for three days for the
public and was judged by other modellers during that time. The layout won three
awards.
- Best model of a railroad.
- Best model railroad scenery.
- Best presented stand / exhibit.
Photo of me with some of the awards in front of the
layout. (54K)
During the show, Ian Chadwick (one of the guys who helped run the layout over the
three days), took some very fine photos. Here they are.
#41 Departing Vance Junction (75K)
#41 at the Coal Drops (71K)
Overall shot of the scenery (83K)
#461 pulling into Vance Junction (76K)
My Current Sn3 Model Railroad
Setting
My new Sn3 layout will be a model of the Dolores area in the Sn3 (hopefully
fairly accurate), with a freelanced timber line representing the Montezuma
Lumber Company. All of this will be set in the "turn of the century" period
so I can run those small locomotives with balloon stacks.
In order to test out some new skills for this layout (such as handlaying track)
I thought I'd better start with the freelanced timeber line. That way any small
mistakes might not be quite so noticable.
Construction
The railroad is built in lightweight sections to allow for future moves. Most
sections are 18 inches to 2 feet wide, and between 6 and 10 feet long. They are
constructed from a light frame of 2"x1" pine, covered with 4 inches of styrene
foam. The sub-roadbed is 1/8" MDF which is laminated to the top of the foam using
liquid nails. The backdrop and overhead valence is supported by a frame of 1 inch
square aluminium tube.
Scenery is made using more layers of styrene which is then carved to shape.
Rock castings and a thin layer of plaster is then put over the styrene to give
texture and a surface to stain. Clay type kitty litter is embeded in the wet
plaster to represent the broken up rocks found in Colorado. The top layer is
the fairly standard Woodland scenics ground foam, polyfibre and plain old dirt
(etc).
Locomotives and Rolling Stock
At the moment I have only two locomotives. Both of which are made from the
excellent Railmaster
kits. These kits consist of an etched brass frame, peweter body components
and lost wax details. They are powered by sagami can motors and use a NWSL
gearbox.
Locomotive #15 is a C-16 class locomtive constructed to represent an early
baldwin locomotive. #42 is a modern C-17 class locomotive which has been painted
with a green boler jacket. Not in period, but I just like it.
Most of the rolling stock has been constructed using PBL plastic kits. These
kits are excellent value for money as they are some of the most detailed plastic
kits that I have built. They all include tcompensated trucks, kaydee couplers
and the decals. All the modeller needs to provide is some basic tools and
paint. As an example of the level of detail included in these models, the 3000
series boxcar even includes the timber bracing on the inside of the car.
Control and Operation
My layout is still controlled using the Digitrax
brand of command control system. This system is DCC compliant and provides excellent
operation and features for a very affordable price.
The locomotives are fitted with Soundraxx
onboard DCC sound systems. After running a layout with DCC sound (which was one of
the reasons I moved to Sn3 in the first place), I don't think I could ever go
back to a "quiet" black based system.
Some pictures (at long last)
Looking down the tracks at Camp 8 (69K)
#42 through a stand of young aspens (79K)
#15 in front of the MOW shed at Camp 8 (70K)
#42 arriving at Crowley Tank (75K)
Looking down the tracks at Crowley Tank (75K)
#15 approaching the tank for water (80K)
Other Model Railroads
Hopefully I can convince some of the other R.G.S modellers on the 'Net to let me
have some pictures from their layouts. When I do I will place the images here.
The Pictures
Charlie Brown
"San Juan Southern" layout plan
Freight train
Ridgway Yard
Dave Conrad
HOn3 diorama
Joe Fuss
#40 in Sn3
Steve Harris
Ophir
Butterfly trestle mill
Dolores
A view of Lightner Creek
Arriving at West Durango
Steve Zonay
Layout under construction
Double deck benchwork
Planning the butterfly trestle
Some finished trestle work
There are bound to be a few other R.G.S modellers on the 'Net who'd like to see some
of their work "published". If that's you then
send me an image. If you just have a photo, that's fine, I can always get it scanned.
Just drop me a line and I'll let you know
my snail-mail address.
|
 >
>